|
A1] To install this software, which has been developed
on Visual Basic and Access, the system should have Windows 95/98
with atleast Internet Explorer 4.02 SP2 or a later version or any
latest Windows edition.
In case the minimum configuration is not found, then the above mentioned
errors may come at the time of installation i.e. in Step 6,
when you click on the Computer Symbol.
To overcome this problem, you would need to first update your system
with Internet Explorer 5.0 and then start installing the Census
2001 software.
For your convenience, we have included the Internet Explorer 5.5
software with this CD in the IE5setup directory. To update Internet
Explorer in your system just run the \ IE5setup \ IE5setup.exe
from the CD. This will update your system.
A2] The Census of India - 2001 software has been
developed for installation in a stand alone machine only.
However, you could access the CD in a LAN by carrying out the following
steps:
1. Insert the CD in the CD drive of the server. *
2. After that, the following should be done on the server (System
A).
The CD Drive of the server has to be shared. If this has not already
been done, please carry out the following instructions:
* The CD drive could be in the server or
in any system connected through a network to the system on which
the software is being installed.
i) Double click on <Mycomputer> of the server
Choose the CD Drive and right click on it
Select <Sharing > from the menu
ii) A window will appear - Choose< Shared as> the
option and give the CD Drive name (as in server) as
the shared name and click <Apply>.
For e.g. if the CD Drive in
the Server node is G: then the Shared name should also be G:
3. Then the following should be done on the
machine that you want to install CD on, i.e. the node (System B).
a) Right click on the Network Neighbourhood (icon seen on
the Desk Top) Choose
<Map Network Drive > from
the menu
b) A small window will appear on the screen. Select a drive to map
the shared CD drive in the server.
c) In the same window, in the space given alongside
< Path >, type the server
name and the shared name, For e.g. if the Server name is "NTServer"
and the Shared name is "G", then the path will be \\ntserver\G.
Click < Ok >
after typing this. You will now
be able to access the CD drive in the server.
Now, you can install the CD in this system
(system B) by following the steps outlined in the installation procedure.
However, please note that the CD can be accessed in the node
(system B) in which it has been installed.
A3] These are all Windows system files. Some
other applications may use these files. Just press the
<Ignore>
button and proceed with the installation. This will not affect the
working of the Census of India - 2001 software.
A4] The software is designed for a standard SVGA
monitor with a screen setting of 800
by 600 pixels. If the software
contents are only partly visible on the monitor, then the screen
settings need to be changed. Please do the following to view the
software contents on a full screen.
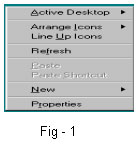
# 1 Right click the mouse on the Windows main screen. A menu similar
to the one shown in Figure-1 will appear.Click on <properties>
from that menu.
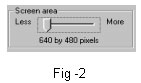
# 2 The Display
Properties menu will appear. Click
the <settings>
option that appears on the right top corner of the new menu. This
will display the present setting of the Desktop
area, as shown in Figure-2.
# 3 Take the mouse pointer
over the needle-like figure that appears between the words Less
and More.
Move the needle towards More
until it displays 800 by 600 pixels
# 4 If the font size is specified as large, change it to <Small
Fonts>
# 5 Click <Ok>
to confirm.
If you are using a VGA monitor, please install
the software on a machine with a SVGA monitor.
|